Saturday, December 29, 2018

Funny Food Valentines

Hi crafty friends!  I hope you all had a wonderful holiday so far!  Mine has been great, I love being home with the kids and getting to do things together.  It's Lisa here with you today, and I'm going to switch gears from one holiday to the next.  Valentines day is probably my second most favorite holiday to make cards for, and it's probably the second biggest holiday in which people receive cards, so it's time to get cracking if you haven't given it a thought yet.  I decided to give my cards a funny spin with the Love Bites Stamp Set by Newton's Nook Designs...


These guys crack me up!  Plus I know my kids will love seeing them in their lunch boxes.  The best part of all?  It only took about 20 minutes to make all three!  These are each measuring at 4 1/4 x 4 1/4".  I then trimmed one sheet of patterned paper and played them at various angles.  For the dotty hearts I used my Altenew Feeling Dotty Stencil, a few Distress Oxide Inks, and a heart die.  

Now the stars of these cards were stamped onto Bristol Cardstock, and watercolored with Zig Clean Color Markers and a water brush.  Once all of them were dry I fussy cut them out and adhered them to the fronts of the cards with foam adhesive.  I did the same for the matching sentiments.

And ta-da!  Three super cute and fun Valentines ready and done...


Thanks so much for stopping by to visit today, and make sure you check out the AH-MAZING Clearance Sale going on in the store right now!!!  

Happy New Year and Crafting!
Lisa

Thursday, December 27, 2018

A Grateful Heart

Hi Crafty Doodle Friends!  It's Julissa from Paper Gems by Jules again with a new simple card to share with you.

The new year is fast approaching and it is a perfect time to reflect on the years past and show gratitude for the highs and lows as they have led us to this great day!  I wanted to share this card today because I love the quote by Catherine Pooler Designs in the "Grateful Heart" stamp set.  

"A grateful heart is a magnet for miracles."


For this card, I started with a wood printed paper and used VersaMark to emboss this beautiful sentiment in a champagne embossing powder.  After heating that and letting it settle, I moved onto stamping the largest flower on white cardstock.


I opted to use the same embossing powder for the floral stamp.  I colored the flowers in shades of pink and the leaves in greens.  The champagne embossing powder gives it an added element of shine.


Keeping the card simple, I trimmed the edge of the wood design paper to give it a look of a pennant.  Layering a similar pink cardstock to the card base, then added a distressed denim card stock, I finally laid the wooden design paper.  For added dimension, I used Scrapbook Adhesive 3-D foam squares under the flower and leaves.  

I hope you enjoyed this card and are inspired to make something beautiful to share on Crafty Doodle Chick Chat & Create Facebook Page.

Until next time... Happy Crafting & Happy New Year!

Items used in this week's blog post.


Wednesday, December 26, 2018

Hello Winter Penguin

Hi! Kerys from Scrappinnhappy here today with my final card for the Crafty Doodle Chick blog.

I adore this cute penguin image from Gerda Steiner designs - Long time no See. I saw him as the perfect winter penguin to go alongside Neat & Tangled's Hello Winter stamp set.


I stamped the penguin image and colored him in with my prismacolor pencils. I then fussy cut him out.

I stamped the Hello Winter word block using versa mark watermark ink and then het embossed it with white embossing powder. I added some white gel pen detail around the edge of the card.

I then popped up the penguin on foam dots and voila! A super simple, CAS style card that anyone can make.

Thank you for all of your support during my design term at Crafty Doodle Chick - I am sure I will still see you on Faceboook and Blogland!

Thanks for looking and don't forget to check out the Crafty Doodle Chick blog for lots of inspiration from the rest of the design team

Happy Crafting x

Gerda Steiner Designs Long Time No See Penguin 3x4
Hello Winter

Tuesday, December 25, 2018

Coffeesaurus Christmas

Merry Christmas, crafty friends!
I am so happy to have you joining me on the CDC blog! This is Milene here.

I really enjoy creating holiday cards using non-holiday stamps. Today I customized my Coffeesaurus stamp set by Gerda Steiner Designs for a Christmas look. Now, I am not very good at hand drawing. However, adding a scarf to your images is just about the easiest thing you could do! I used a fine line black Sharpie to quickly add some lines. If you get it a little wonky, do not worry! Add some patterns to your design and it will look just fine.


I colored my dinosaur using Tombow markers and a Wink of Stella shimmer pen. The colors I used matched the pattern paper I chose for this card. I went for a very Christmasy palette today. I created a few layers to my card using using pattern paper and vellum. I used the A2 scalloped frame dies by Honey Bee stamps for a special touch - A7 available in the store


My sentiment was white heat embossed with a combination of two stamp sets. I used the Coffeesaurus and also a Lawn Fawn set I had in my stash. You could use the "Merry Christmas" from Holiday Helpers, or whatever you have in your stash.

To make my dinosaur even more fun, I popped him up on an action wobble. He looks awesome moving around! I added a few red sequins and that was it.

Once again, thanks so much for joining me today.

Merry Christmas to you and yours!

See you next time,


Friday, December 21, 2018

I Can't Thank You Enough...

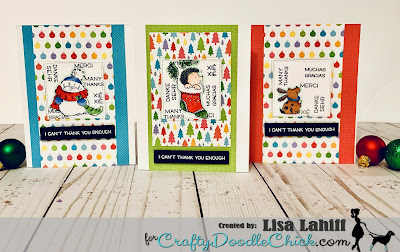
Hello wonderful crafty friends!  It's Lisa here with you today on this fabulous Friday, and I have a set of three thank you cards to share with you.  Recently I've gone back to work as a Special Educational Aide and I am in need of some thank you cards for a few of the kind students and their families who brought in gifts for the Holidays.  So I thought why not bust out some of my favorite crafty supplies that can be found in the Crafty Doodle Chick Store today and make personal thank you notes...


I created these three cards with slightly different sizes as I was using pre-cut paper from my Lawn Fawn Really Rainbow Christmas Petite Paper Pad from previous projects.  I then stamped these cute critters from the Penny Black Stamp Set: Merry Delight onto Spectrum Noir Ultra Smooth cardstock, masked them and added thank you sentiments from the Lawn Fawn Reveal Wheel Sentiments Stamp Set randomly in the background.  Next I diecut squares around my stamped images and in the middle of my patterned papers.  I layered the diets together onto more patterned paper before adding them to my card bases.  To finish these cards I stamped and heat embossed a final sentiment onto black cardstock.


Thanks so much for stopping by and Happy Crafting!
Lisa

Supplies Used:
   

Thursday, December 20, 2018

And They Call It Puppy Love...

Hey everyone!  This is Julissa from Paper Gems by Jules back to share this paw-some card using Penny Black's "All Fours" cling stamp.  Anyone that knows me, knows that I'm a HUGE dog lover.  I have two rescues that have brought so much love to our home.  Meet Oakley and Sandy!


Back to crafting... I started by stamping the image on Bristol smooth paper.  I then used both Copics and Spectrum Noirs to color in the images.  Once done coloring, I fussy cut the image out, leaving the bottom a straight cut so it would be flush with the background paper.  I then added silver glitter stickles on the buttons of this fabulous dogwalker's shirt and let that dry.


I then moved onto the background.  I used Barn Door and Festive Berries distress inks to color the background.  Then to add a little shadowing, I used Black Soot only on the edges.  With a little splash of water, I added a little texture to the background.  Then I stamped the sentiment "True Love Walks on all Fours."  Don't you just love that!?!


Because this image is rather large, I used a larger card base of 5" x 6.5".  I added a fun polkadot paper at 4.5" x 6".  The distressed layer is 4" x 5.5".  Once those two layers are adhered to the card base, I used 3D Adhesive Squares behind the image and lined it up to the bottom of the top layer.  


Now to add some final touches, I used some Wink of Stella to add a little glimmer to the dog tag and each dog's nose.  I love how this all came together. Although, I can't imagine walking my dogs in heels, this chick surely makes it look so fabulous.


Thanks for joining me on my crafty dog walk.  I hope you found some inspiration.  
Until next time, Happy Crafting!

Penny Black - All Fours


Wednesday, December 19, 2018

Have Yourself a Merry Little Christmas

Hi! Kerys from Scrappinnhappy here today with a fun stamp set from Avery Elle - A Merry Little Christmas.


I stamped the images and colored them in with my prismacolor pencils. I then fussy cut them out.

I used Sunny Studios Window Trio Square die to cut out the windows in the back panel and backed this with some green polka dot paper from Sunny Studios Polka-dot Parade 6x6 paper pack.

I used the same stamp set to stamp the sentiment and snowflakes onto the background panel. I added some green enamel dots to finish it off. This was then adhered onto some red polka dot paper from the same collection.

I love how the design of this card cane together.

Thanks for looking and don't forget to check out the Crafty Doodle Chick blog for lots of inspiration from the rest of the design team

Happy Crafting x

A Merry Little Christmas Clear Stamps - Avery Elle
WINDOW TRIO SQUARE DIE-Sunny StudioPOLKA-DOT PARADE PAPER Sunny Studio

Sunday, December 16, 2018

Coffeesaurus & Friends


Hi everyone, happy Sunday!
This is Milene here today. Welcome to the CDC blog!

Are you a coffee drinker? Or maybe you have a friend that loves coffee?! Either way, you need this cute little Coffeesaurus stamp set in your life! I simply adore the images by Gerda Steiner Design's used on today’s card.


I really love one-layer cards. I am also a fan of combining masked images with a beautiful stencil, and that is what I did here. I started out by combining Gerda Steiner Design's stamps sets that I had in my stash. CoffeesaurusHedgehog with Coffee and Harvest Mouse. Have fun combining the sets you have in your stash!

When masking for a one-layer card, be sure to stamp “forward to backwards” – meaning you will want to stamp what is on the foreground first. In this case, I first stamped my dinosaur. I then masked him and stamped his friends on each side. I did fussy cut masks for every critter, as I wanted to ink blend the background. After placing the masks in place, I lighted ink blended my background using Evergreen Bough Distress Ink. I then applied the Newton's Nook Starfield stencil to the background using a heavier hand.


Once the background was done, I moved on to the cute critters. I hand drew a scarf around the mouse’s neck with a black Sharpie. I am not very good at hand drawing so, if I can do it, so can you! I colored my images using Tombow markers and a Wink of Stella shimmer pen. I finished it off by stamping my sentiment in Versafine ink and Wilted Violet Distress Oxide ink.


I am off to grab a cup of coffee. See you next time!


Friday, December 14, 2018

Flowers for Christmas? Yes!

Hi friends!  It's Lisa here with you today and I have a new holiday card to share with all of you that uses a non-holiday stamp set!  Now of course I own my fair share of Holiday themed stamp sets, but I also like to find ways to use other sets I already have on hand.  Today's card features the Striped Florals by Altenew...


With a few traditional Christmas colors the florals fit perfectly with my holiday sentiment.  Since this card requires basic stamping for the background it's also great for mass producing.  I then went around the edges with Distress Oxide Ink.  My sentiment was stamped and heat embossed onto vellum so as to not take away from the background.


So take a second look at those floral stamps you own, and bring them to life on your holiday projects.
Happy Crafting!
Lisa

Supplies Used:
  

Thursday, December 13, 2018

Merry Mandala Christmas

Hi everyone! šŸ™‹ It's Julissa of Paper Gems by Jules back to share a fun way to make a simple Christmas card.  This time I made two different types of cards using the same two dies.  Read along to see how you can extend the use of your dies in your next card.

I used one of My Favorite Things' Mandala dies called Mesmerized Mandala and one of Lawn Fawn's Line Border Dies saying Merry Christmas to make both cards.  The first card I used the mandala die and an embossing pad to dry emboss the background paper.  This gave the card a little more texture.  Once adding the mandala, I layered three of the Merry Christmas dies to give it a more solid position on the card.  


Dry embossing with dies allows you to add texture to your paper without adding bulk to your card.  

For the second card, I kept it a bit more simple.  Centering both dies, allowed for a focal point on a simple and elegant card.  

I hope you were inspired with these cards.  Don't forget to share your crafty cards and creations on the Crafty Doodle Chick Chat & Create Facebook page.  We'd love to see your work!


Until then... Happy Crafting!

Wednesday, December 12, 2018

You Warm my Heart

Hi! Kerys from Scrappinnhappy here today with a super adorable hedgehog image from Gerda Steiner designs. This stamp set is called Coffee Hedgehog.


I stamped the images and colored them in with my prismacolor pencils. I also stamped the image onto some patterned paper and paper pieced the scarf in place.

For the background window I used Lawn Fawn's Reverse Stitched Scalloped Rectangle Window die set. I love the inside scalloped detail on this die set - it just a little different from the norm.

All of the patterned paper comes from Doodlebug's Cream & Sugar 6x6 paper pad. Super cute and love the way the colors and patterns coordinate so well.

I popped up the sentiment banner and coffee cup on foam dots and added a thin kraft border around the edge to finish the card off! 

A super simple and quick & easy card to make!

Thanks for looking and don't forget to check out the Crafty Doodle Chick blog for lots of inspiration from the rest of the design team

Happy Crafting x

Hedgehog with Coffee 2 x 3 Clear stamp Set
reverse stitched scalloped rectangle windows - lawn cutsDoodlebug CREAM AND SUGAR 6x6 Paper Pad