Friday, June 29, 2018

Watercoloring + Markers = Magic!

Hello crafty friends!!!  It's Lisa here and I have had the awesome pleasure of taking a class through Altenew with Kelly Latevola... she is an amazing colorist/crafter!!!  Like seriously, my chin drops to my desk when I'm watching her videos.  With that being said my card is totally inspired and a lift of her card from Day 6 of her class...


This card features two ah-ha techniques I've never thought to do... 1) Color over watercoloring and 2) adding texture to the background rather than just color...

To create this card I started by stamping the flowers from the Beautiful Day Stamp Set by Altenew with My Favorite Things Hybrid Ink.  Before any watercoloring was done I then went over the area in between my flowers with the Altenew Leaf Burst Stencil with Altenew Dye Ink.  

The watercoloring on this card uses the wet on wet technique and is very free form... just the way I like it!  This means that I watered my background area first with just clean water and then dropped in various Distress Oxide Inks in blues.  I then added clean water to the floral areas and used my brush to drop in red, yellow, and purple inks on the flower images and greens on the leaves.

I was so excited with how vibrant the colors stayed that I didn't even need to go back over them, so I set the panel to the side to dry.  Once everything was dry I went over the images with slightly darker Spectrum Noir Markers.  I have never thought to use markers over my watercoloring, but I'm in love!  

For the sentiment I chose a small and scripty one from the GinaK Designs Scripty Sayings 1.  I love how elegant this looks going across the middle of my card.  As a few finishing touches I went over the edges with black ink and rhinestones.


I should also mention that all of this was done on watercolor cardstock.  Thank you so much for stopping by and I hope I've inspired you to maybe add some color over your watercoloring, or simply add texture to your white space with stencils... either way I appreciate you stopping by and wish you Happy Crafting!
Lisa

Supplies Used:


Wednesday, June 27, 2018

Stomping By

Hi! It's Kerys from Scrappinnhappy, and it's my turn on the Crafty Doodle Chick blog today with some fun MFT products! As many of you know, MFT is one of my favorite crafty companies, and this older set is one of my favorite 'boy' stamp sets.

I used MFT's 'Delightful Dinosaurs' stamp set,  in stock at the


I wanted a simple 'childlike' card and so colored the images using my zig pens for a bold look. I added some white detailing with a gel pen and then fussy cut them out.

I stamped the sentiment from the same 'Delightful Dinosaurs' set and used MFT's 'Stitched Sentiment Strips' dies to cut out the banner. I 'popped' this banner up on foam dots over the images and wording.

I used MFT's 'Hello' die-namic for the larger wording - cutting it out 3 times and stacking them on top of each other for added dimension.

A fun and super simple card!


Thanks for looking and don't forget to check out the Crafty Doodle Chick blog every day for lots of inspiration from the rest of the design team

Happy Crafting. x

Tuesday, June 26, 2018

Sublime Underwater Shadow Boxes

Hi friends - Milene here once again!

I have another really fun project to share with you today, featuring Lawn Fawn products. I love the Lawn Fawn You Are Sublime stamp set so much! It has to be my favorite from the summer release. I love it so much, I had to stamp and color all of the images. Given that I had so many cute images to play with, I decided to create multiple projects. 


I have recently purchased the Lawn Fawn Shadow Box Card die and I was so excited to finally use it. Lawn Fawn has also released a really fun add on to the shadow box, the Ocean Add-On, that is all underwater themed! This new die set is on my wishlist but, unfortunately, I don't own it yet.


Putting the box together is very simple. You run the largest die through your die cutting machine twice. Be sure to use a good, strong cardstock for your box to stand up nicely. You'll want to die cut a window out of one of those two panels. If you choose to use the hills included in the die set, you'll want to add them before closing your box. I chose to use both hills on each of my projects, using a light craft cardstock to resemble sand. All you need to do is place double sided adhesive on the tabs and close it all shut! 


I decided to add the bubble pattern paper to the back of my little scene. The paper is from the Doodlebug Anchors Aweigh 6x6 paper pack. Right here was when I made my first mistake! I should have sealed my box prior to adding the pattern paper. Because I didn't, however, I had the tab showing on the inside of my card. I didn't want the tabs to show, so I used a strip of yellow pattern paper to cover it up. I didn't love it, but I also didn't want to start all over. Keep this in mind if you're adding anything to your background!


I also added pattern paper to both sides of my boxes, using one of the dies included in the set. I chose a striped design here. The sentiment on each card was my second "mistake". I stamped them all on the back of my boxes, coordinating to the images I had chosen. I think it worked out fine, but I wish I had stamped the sentiments on the hills of each scenes. That would have been more fun!


Moving on from my mistakes, comes the fun part! I watercolored all of my images and cut them out using my ScanNCut. Now it's time to add them to the shadow boxes. I moved them around a bit until I thought I had a substantial scene. I quickly realized I would need more little fish and decorations, so I stamped and watercolored some more. While those were drying, I added some finishing touches to my shadow boxes. I used a white gel pen to add little dots to the frames of the boxes and also used a black glaze pen on the eyes of the fish.


I placed my additional images to my cards and I was done! I hope you enjoy my underwater scenes and shadow boxes.

EDIT: I totally forgot to mention that some of my images were glued to a piece of thick acetate. I wanted to make them look as they were floating, or swimming. I used the heavier weight acetate I had in my stash for this, so that the images would hold up well. You'll be able to see the little strips of acetate in some of the pictures here! Most of my images, however, were glued down to the box itself or sand hills.


I would like to thank Jennifer once again for having me be one of the guest designers this month! I've had lots of fun during these few weeks and I'm very thankful for this opportunity.

If you would like to see my future projects, you can find me on Instagram.
Thank you for stopping by today and have a great day!


Monday, June 25, 2018

Love Bug Birthday

Hi!  This is Marcia with The Frolicking Fairy and today is my last Guest Design post for Crafty Doodle Chick; I hope you have enjoyed my weekly posts for Jennifer and her shop.  :)  For my final card, I elected to use Flora & Fauna's Love Bug Dress Up Set (which is sadly "Out of Stock" at the moment; BUT FF's Love Bug Set is in and is a companion set) and Altenew's Fine Frames Circles Dies.  I also needed an excuse to play with my new Catherine Pooler inks, and what a great excuse indeed!  
#thefrolickingfairy #craftydoodlechick #guestdesignteam #catherinepooler #floraandfauna #altenew #lovebugdressupset #lovebug #vdub #cas #cleanandsimple #birthday #birthdaycard
I thought it would be fun to keep the colors warm for summer, selecting Tutti Fruitti, Rockin' Red, and Tiki Torch inks from Catherine Pooler.  I stamped the love bugs in a row on a piece of white cardstock then gold embossed the unicorn "hat" and crown onto the smaller love bugs on either end.  For the "Happy Birthday", I carefully applied Nuvo glue pen onto the stamp and then sprinkled on Nuvo's micro fine glitter in gold.  I trimmed the panel down to 3.75" wide and glued a thin strip of scrap blue paper to the very bottom to ground the cars.  
#thefrolickingfairy #craftydoodlechick #guestdesignteam #catherinepooler #floraandfauna #altenew #lovebugdressupset #lovebug #vdub #cas #cleanandsimple #birthday #birthdaycard
To add some fun, I cut some circle frames using Altenew's Fine Frames Circles Die, closing 4 and covering with the glue pen then gold micro fine glitter.  I used a sheet of Lawn Fawn patterned paper from my stash for the background and layered everything onto the card base.  A smattering of sequins finished this love bug birthday!
#thefrolickingfairy #craftydoodlechick #guestdesignteam #catherinepooler #floraandfauna #altenew #lovebugdressupset #lovebug #vdub #cas #cleanandsimple #birthday #birthdaycard
I think the card is summery and light, and it makes me smile.  These inks really are wonderful; they even out nicely and the colors are beautiful.  I'm so glad I let Jennifer (and others.. RACHEL) talk me into buying them.  Thanks for joining me this month, and I know you'll see me around the Crafty Doodle Chick Chat & Create Facebook page; and of course, if you already follow me, I'll be back for more soon!!  Big hugs!  xo
#thefrolickingfairy #craftydoodlechick #guestdesignteam #catherinepooler #floraandfauna #altenew #lovebugdressupset #lovebug #vdub #cas #cleanandsimple #birthday #birthdaycard
___
#thefrolickingfairy #craftydoodlechick #guestdesignteam #catherinepooler #floraandfauna #altenew #lovebugdressupset #lovebug #vdub #cas #cleanandsimple #birthday #birthdaycard

Friday, June 22, 2018

Creative Playtime Turned Useful

Hello!  It is Friday and I have had some fun just playing around lately with a few of my newest goodies.  In particular, with stencils.  I have used them on a few project on here as of late and I still can't get enough.  Today's card actually came about by experimenting with a mix of mediums and my Studio Katia Mandala Stencil.  This stencil is very intricate and needs to be kept very still so as not to get a blurry look rather than the design of the stencil itself.  

When I first started playing with the stencil I used Distress Oxide inks, but used a bit too heavy of a hand and the design lost it's look.  Since I was already playing around with it I decided to add a few spritz of a purple and gold Prima Marketing Color bloom Sprays.  While I knew I wasn't going to use this as the panel for my card I kept looking at the colors on the opposite side of the stencil and couldn't bare them going to waste.  So I grabbed a panel of watercolor cardstock and simply rubbed it over this side of the stencil, and was pleasantly surprised!


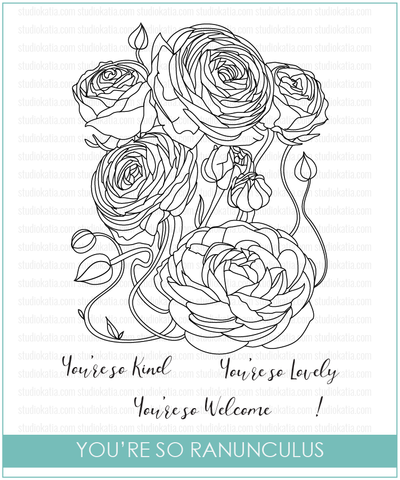
Isn't it gorgeous?!  And the shine in person is just so much better!  Since the panel turned out so beautifully I didn't want to cover much of it up so I went with a stamped and embossed sentiment from the Studio Katia You're So Ranunculus stamp set.  I then added some metallic string behind it and finished it off with a mix of crystals and rhinestones.  To help the panel edge stand out against a white cardbase so I went over the edges with black ink.


Thank you so much for stopping by today!  I hope to see how you use your stencils over in our Facebook group, and maybe join in our challenges too!
Happy Crafting!
Lisa


Supplies Used:


Wednesday, June 20, 2018

Thank You from Lawn Fawn

Hi! Kerys here from Scrappinnhappy with my weekly post and some cute Lawn Fawn products!
Lawn Fawn is quickly becoming one of my favorite brands right now.

I used Lawn Fawn's 'Little Flowers' die set, soon to be back in stock at the
 Crafty Doodle Chick store.


I die cut the flowers and grass borders using Lawn Fawn's 'Really Rainbow' 6x6 paper pad.
I added some white detailing using a white gel pen.

I used a cloud stencil and distress ink to create the background and then stamped the sentiment using Lawn Fawn's 'Reveal Wheel Sentiments' stamp set.

A few enamel hearts finished the card off!


Thanks for looking and don't forget to check out the Crafty Doodle Chick blog every day for lots of inspiration from the rest of the design team

Happy Crafting.

Tuesday, June 19, 2018

Pivot Rainbow Painters

Hi friends! Milene here with my third project as a guest designer for Crafty Doodle Chick! :) 

 I have a really fun card to share with you today. Seriously, the Lawn Fawn Pivot Pop-Up die is FUN! I have a mix and match of products going on here, so let's jump right to the tutorial!


I started out by stamping and heat embossing some images from the Neat and Tangled Paint Night set. I chose the two larger images in the set (both of the little girls), and also stamped the canvas image five times. I used Versafine ink and clear embossing powder to accentuate the lines. I added the individual scene stamp to the canvas that the little girl was holding. As this panel would be on my card front, I also heat embossed the sentiment below the girl.


Distress inks are great for both ink blending and watercoloring, so I chose to use them today. I watercolored most of my images using the inks, but I did also use my watercolor palette, as I didn't have good neutrals in my Distress collection. The same colors of ink were used to ink blend a rainbow on the edges of a piece of Bristol Smooth cardstock. I only wanted the two sides to show, so I didn't bother ink blending the full panel. My card front was kept really simple, as the fun would be  in the inside of the card!


For the inside, I used a combination of Lawn Fawn paper packs. The top and bottom pieces are from the Lawn Fawn Really Rainbow Petite paper pack. I also added a rectangle of white regular cardstock to the bottom so that I could write my message clearly. The yellow paper with tiny hearts, however, is from the Lawn Fawn Let's Polka In The Meadow paper pack.  When using pattern paper with the Pivot die, you want to make sure that your patterns align. Therefore, you should rotate your die 180 degrees before running it through your machine for the second time. 

I don't have pictures of the step by step process of assembling the die, but it is much easier than it seems. I would recommend that you watch Lawn Fawn's tutorials to see how it all comes together. This was my first time using the die and it was very simple. If you have any questions, however, please leave them in the comments below!


When all of my pieces were die cut and my images were colored, it was just a matter of assembling my card. All of my images were cut out using the Brother Scan n Cut machine. When it comes to the assembly, be sure to use very strong tape here, as your project will be very manipulated. My other tip would be to use a lighter weight paper for the mechanism inside the card. I first used 110lb cardstock, but that was very difficult to fold. For my second attempt I used 65lb cardstock, and that worked out really well.


I hope you have enjoyed this tutorial and that my colorful card will brighten your day!
I'll see you next week for my final guest designing project! 


Monday, June 18, 2018

Water You Up To?

Hi!  This is Marcia from The Frolicking Fairy, and since it is Monday, it is time for another Guest Design spot for Crafty Doodle Chick!  I chose to play with the fun Pool Piggies from Gerda Steiner Designs.  Those four little piggies are thoroughly enjoying the summer sun!  I wanted to use some of the patterned papers I've amassed in my stash, and found a perfect wave print for the pool and yellow polka dot print for the sunny background.  I thought it would be a fun change to watercolor the bikini pig.  I embossed her first onto watercolor paper using white embossing powder, applied a mask, then stamped and embossed the long float over her, also using white embossing powder.  
#thefrolickingfairy #craftydoodlechick #gerdasteinerdesigns #simonsaysstamp #poolpiggies #seayousoon #pool #pig #summer #distressmarkers #watercolor #staycool #handmade #handmadecards
I colored everything with my Distress Markers and a water brush in the following colors: Worn Lipstick, Festive Berries, Mustard Seed, Squeezed Lemonade, Salty Ocean, and Black Soot, adding polka dots to her bikini with a white gel pen.  Then, I fussy cut out the float.  Using a circle die in my stash, I cut a pool from my blue printed paper and layered on Glossy Accents to make it appear wet.  I added Glossy Accents to the piggy's sunglasses too.  For the sunny panel, I cut the sunny yellow paper down to 4" x 5.25" and heat embossed a cloud and stamped some birds from Sea You Soon from Simon Says Stamp.  The sentiment, also from that set, was stamped on a scrap of white cardstock using VersaFine Onyx Black ink.  I rounded three of the four corners on both the aqua card base and the sunny yellow front panel then assembled the card!  For dimension, the pool and sentiment were attached with foam tape, and the piggy was added with foam tape atop the pool.
#thefrolickingfairy #craftydoodlechick #gerdasteinerdesigns #simonsaysstamp #poolpiggies #seayousoon #pool #pig #summer #distressmarkers #watercolor #staycool #handmade #handmadecards
Thank you for joining me!  I'll be back next Monday for my last guest design blog!  I wonder what set I'll play with next!  Until next time.. xo
#thefrolickingfairy #craftydoodlechick #gerdasteinerdesigns #simonsaysstamp #poolpiggies #seayousoon #pool #pig #summer #distressmarkers #watercolor #staycool #handmade #handmadecards
___
#thefrolickingfairy #craftydoodlechick #gerdasteinerdesigns #simonsaysstamp #poolpiggies #seayousoon #pool #pig #summer #distressmarkers #watercolor #staycool #handmade #handmadecards

Friday, June 15, 2018

Reveal Wheel Fun with Lisa

Woot woot!  It's Friday my beautiful crafty friends and I am here today with a super fun interactive card using the new Lawn Fawn Reveal Wheel.  Now before I get started yes, I know this die is currently sold out, but don't worry!  Just sign up to be informed when the die is back in and you will receive an email.  In the mean time there are lots of other great Lawn Fawn Products from the last release still available.  Like the two sets I paired today's card with...


Isn't this so much fun?  My son said it might be my best card yet, lol.  Either way I had a great time coloring the images in from the Screen Time Set with my Spectrum Noir Illustrator Markers before cutting them all out.  I then set these guys off to the side, while I worked on putting the interactive element together.  

I found this awesome video on the Lawn Fawn Youtube Channel that shows you exactly how to put your die cut pieces together.  Keep in mind that you will need a brad of some kind to keep your wheel in place and spinning.  For my sentiments I used the matching Reveal Wheel Sentiments set to keep the design simple.  For my top layer I used a mix of older Lawn Fawn paper and Sunny Studio Stamps Rainbow Bright Paper (this is one of my all time favorite stacks as it's so happy, and well rainbowy lol).


Here is a second look at the card after I've turned the dial...


I hope I've inspired you to try creating your own interactive cards in the near future!  And like I said make sure you check out the other new Lawn Fawn goodies as there is a super cute Coaster Critters Stamp Set that matches with the Slide On Over Add - On Die.

Thanks so much for stopping by and Happy Crafting!
Lisa

Supplies Used: