Thursday, February 28, 2019

You're Beautiful!

Hi everyone!  It's Julissa of PaperGemsByJules.com back to share another fun and creative way to use your smaller stamps to build a background with dimension.  This week I took a creative note from Jennifer McGuire who used dimensional to add small die cut images in a pattern on her card.  I decided to make a background using small stamped images.  Follow along to see how you can make this fun background using any one of your smaller stamps.


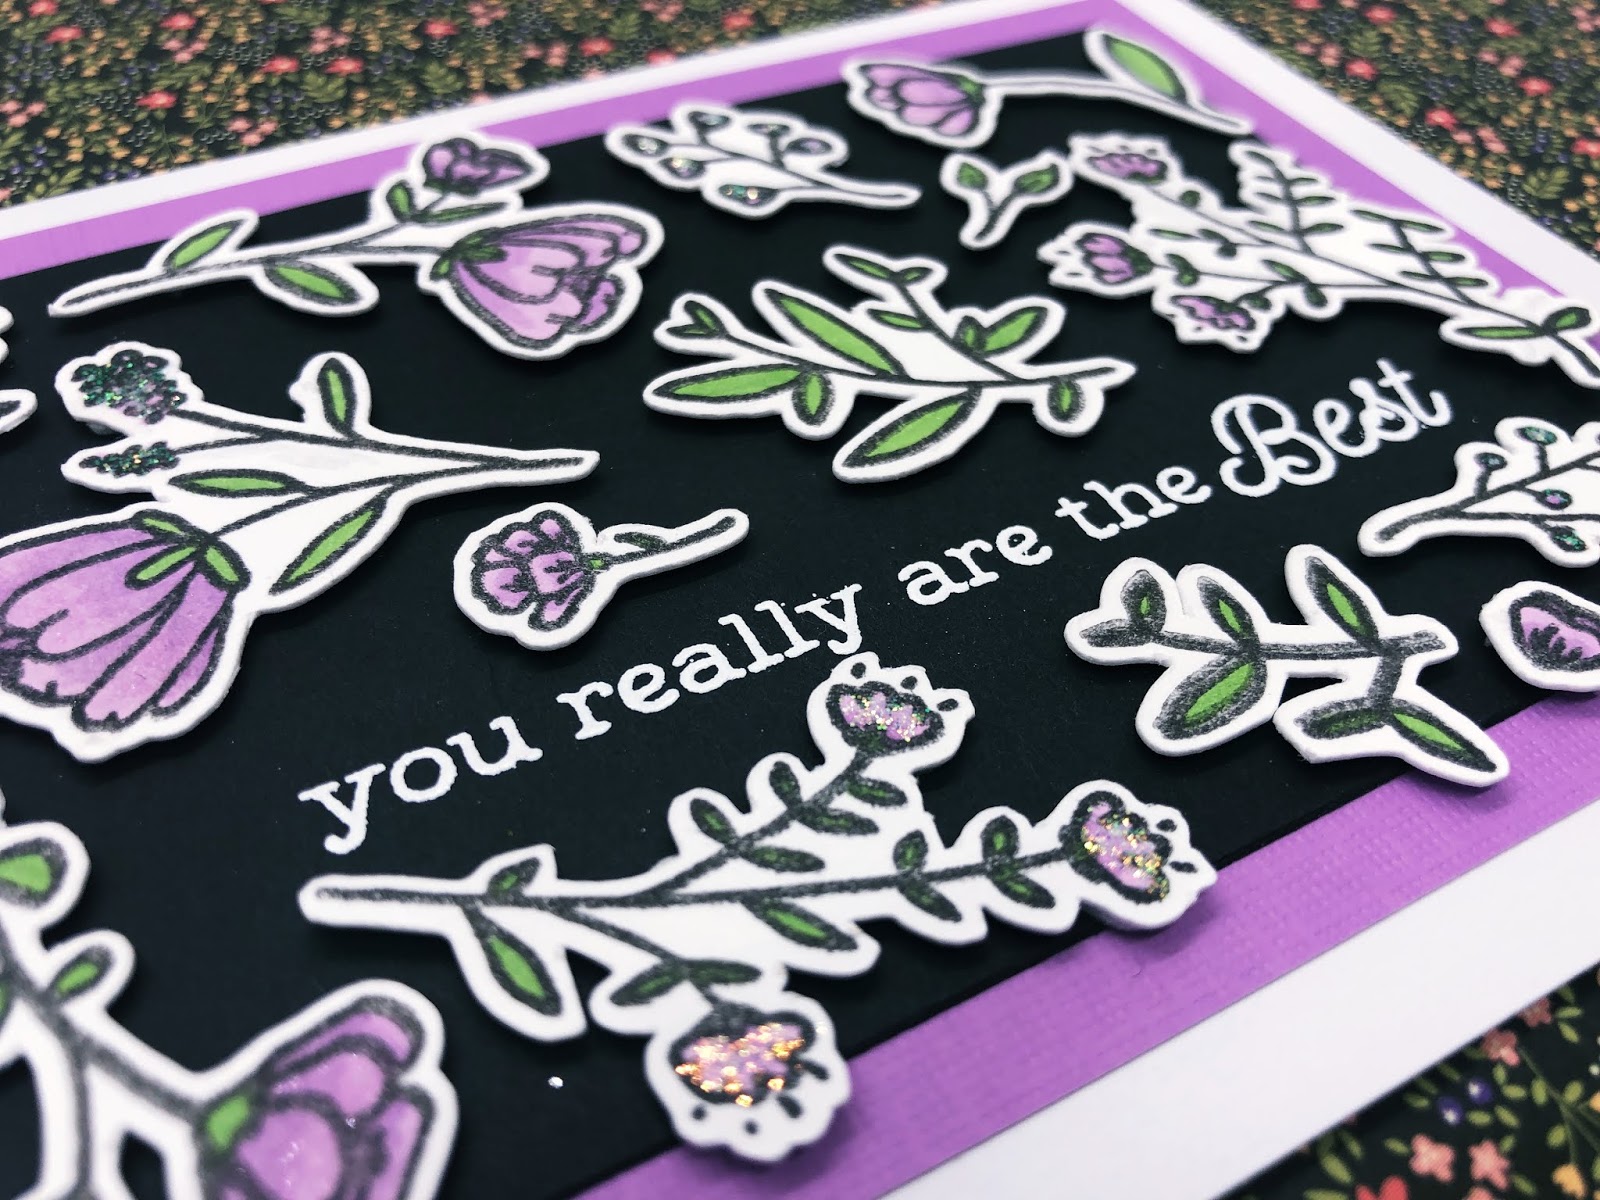
For this card, I used my Hero Arts "You're Beautiful" stamp set because it has so many beautiful little florals.  In most cases, I would stamp these on the actual card stock, but this time, I stamped them all and used my Brother Scan & Cut to cut out all the individual images.

Next, I cut a piece of white and black card stocks in 3.25" x 4.5" size.  I stamped the sentiment off centered to add a little interest.  Then, I laid out the cut florals around the white paper.  But rather than just apply them, I took a photo of it and then flipped each one over to add Scrapbook Adhesive Thin 3D Foam Squares.  Some I had to cut to fit on the smaller pieces, but they work great.


For this first card, I backed the completed layout onto a black 4" x 5.25" piece of card stock and adhered this one to a light purple card base.


For the second card, I backed it on a purple card stock and adhered it to a white card base.  Same technique, but different look.  And all of these pieces were from stamping almost all the images twice, and I still had some left over!  Below are some close up shots of each card showing a better angle of how the foam squares give the images some dimension.


I hope you enjoyed this and possibly learned a fun new technique for you next Crafty Doodle Card!  Make sure to take pictures of your work and share them on the Crafty Doodle Chick Chat & Create Facebook page and when posting on Instagram, make sure to use #craftydoodlechick.

Until next time...
Happy Crafting!


Friday, February 22, 2019

Kind Words... And A Winner

Hello Crafty Friends!  It's Lisa here with all of you today and I have a one layer card to share with all of you.  I love a beautiful and intricate designed image when I want to do a little coloring.  For today's card I've used the beautiful Mandala Flower Stamp Set by Studio Katia...


To create my card I started by stamping the Mandala Flower in opposite corners with Black Memento Ink, and then colored them in with Spectrum Noir Markers.  Next I stamped one of my favorite sentiments from the Altenew Beautiful Quotes Stamp Set with Altenew Ink.  Finally I added some sparkle to each colored image with a mix of Spectrum Noir Sparkle Pen in Clear and Nuvo Glitter Drops.


One layer cards are great for mailing, and they are a great way to remind us that sometimes less is more.  Thanks so much for stopping by to check out my card today! 

And while we are here I thought I would post my Birthday Giveaway Winner.  Thank you to everyone who took the time to enter my giveaway!  Drum Roll Please..........................

Avra Williams said...
Commented on Crafty Doodle Chick :)


Happy Crafting!
Lisa

Supplies:

https://craftydoodlechick.com/collections/altenew/products/beautiful-quotes-altenew  https://craftydoodlechick.com/products/stks019-mandala-flower-clear-stamp-set  


Thursday, February 21, 2019

Stamps for All Seasons

Hi Crafty Doodle Crafters!!  It's Julissa of Paper Gems by Jules back to share a fun stamp set by Avery Elle that you can use ALL YEAR ROUND!  The newly added "More Stories" stamp set features four adorable characters:  a rabbit, a fox, a penguin and a hedgehog.  It also has so many various stamps to create scenes for any season.  Below are four different cards showing each season:  winter, spring, summer and fall.


This first card is a wintery scene.  I used four distress inks:  Chipped Sapphire, Seedless Preserves, Victorian Velvet and Scattered Straw to create the background.  I splattered water on the background and used a paper towel to soak it up creating a bleaching effect in spots.  I then splattered white Picket Fence spray stain to create a starry effect.  I added a 1.375 inch piece of velum on the bottom to create the look of an icy floor.  From there I added the sweet little penguin, stars, moon and sentiment banner to complete this wintery scene.


For my second card, I moved onto a spring scene filled with love.  This little bunny is sending some love.  I used watercolor paper and created the background.  I then used a heart shaped die to cut out the background.  I also die cut some clouds.  I then stamped the three hearts on the background and colored them red.  To add a little more depth, I die cut a larger heart and put that behind the watercolor heart.  I then added all the elements from the stamp set.  Using Nuvo Crystal Drops, i filled in the hearts to give them some shine.  Now, we're on to summer.


Who doesn't love a warm summer night.  Well, this little fox is enjoying a new glowing friend on this starry night.  Using distress inks again, I created this bright night background.  I made sure to color only within the lines of the oval shape I die cut out of navy cardstock that placed over the background later on.  Once the background was complete, I die cut some birch trees and glued them to the navy cardstock and then centered that onto my colored background.  Now to add the cute critters.  I added the firefly, fox and sentiment using Scrapbook Adhesives Foam Squares.  And for a little fun, I used some glittery Stickles onto the fireflies wings.  Now, let's breeze into fall.


Last, but not least, my favorite season, fall!  I don't know about you, but I love the colors in nature during fall.  In this scene, once again, I used four colors of Distress Inks:  Rusty Hinge, Wild Honey, Fossilized Amber and Peeled Paint to create the background.  I then stamped the sentiment and some grass to give this little hedgehog a place to sit.  From there, I drew in a tree branch... yep, I dared to freehand this one.  From there, I stamped the two leaves in the stamp set all over the background.  I colored those in red, yellow, orange and green.  Lastly, I added our cute hedgehog, mushroom and a couple of leaves I had cut out.  He's just enjoying nature and thinking of you.

How great is it to be able to get so much out of just ONE stamp set!  Check out this stamp set and many more at CraftyDoodleChick.com.  And don't forget to subscribe to get notifications on sales and blog posts.  For more inspiration, follow @CraftyDoodleChick on Instagram and FaceBook!  

Thanks so much and until next time...

Happy Crafting!


Sunday, February 17, 2019

Relax & Enjoy RUB-A-DUB-DUB


Please welcome our special guest.. Corinne & Annina

Hi Crafty Doodle Chick Friends! It’s Corinne from Goldklecks based in Switzerland here today to share the RUB-A-DUB-DUB Set by Lawn Fawn. I’m very excited that’s my first time.

I started with a light blue paper and used the Quilted Backdrop by Lawn Fawn. For the carpet, I used the pond from the Bayou Backdrop Set by Lawn Fawn. I stamped the motifs with Gina K. Designs Amalgam Ink. To make sure the mother pays attention to her ducklings I mirrored her.
I colored all the images with Copic markers.  For the bath foam and the jet of water I used Velum. I embossed them with silver and iridescent sparkle embossing powder.
To get a shine, I covered the shower with Nuovo Drops clear.
To add some finishing touches, I have covered the bubbles with Nuvo Drops Glitter and then increased with Scrapbook Adhesives. I love these soap bubbles!
I’m very proud to be featured on this blog. Thank you very much, hope to see you soon!
Please make sure to check out our other cards on Instagram GOLDKLECKS.
Happy Ducklings!
Corinne & Annina
Goldklecks


Supplies used:


Friday, February 15, 2019

Floral Beauty

Hello friends!  It's Lisa here with you today and I have a beautiful watercolored floral card to share with all of you...


I love a large floral image and this beautiful one is from the Peonies Stamp Set by Hero Arts.  To color my image in I used my Tombow Dual Brush Pens and a waterbrush.  I began by coloring just the darkest areas in with the marker and then pulled the color out with the waterbrush.  I did this for the leaves as well.

While these dried I worked on my background by smooshing some Distress Oxide Ink in similar colors and spritzed it with water before I laid my panel in it.  I finished the panel off with a few splashes of grey.  I decided to add these same splashes to my flower to bring it all together.  I then cut the flowers out and arranged them onto the panel.  I added an embossed sentiment from GinaK Designs to the front and finished the card with a few flat rhinestones.


Thanks so much for stopping by!  Don't forget to check out the Crafty Doodle Chick Store and all of the new goodies that arriving weekly!


Happy Crafting!
Lisa


Supplies Used:

Thursday, February 14, 2019

Sending Valentine Hedgehugs!

Hey everyone, it's Julissa from Paper Gems by Jules sharing this cute little card, just in time for Valentine's Day!  This card features the adorable Lawn Fawn's Hedgehugs falling in love.  Follow along to see how you can take these little stamps and fill an entire card up.


When I first saw this stamp set, I thought, how cute would be it be to have a bunch of regular hedgehogs, but these two found each other.  So I added both clear stamps to one acrylic blog to stamp them consistently.  To make the main ones stand out, I stamped them in Gina K Amalgam ink.  I cleaned that off and then used Catherine Pooler's Sand Castle ink to repeatedly stamp the hedgehog couple around them.


Using Spectrum Noir alcohol markers, I flicked shades of brown in the "hair" of the hedgehog.  Leaving white space gives it a little more depth.  I then colored the body in two shades of light brown.  You almost don't see the little pink in the female hedgehogs cheek, but she is blushing.  I colored in the heart with red, but added a little red Stickles to show some more love.  Lastly, I added a super light beige under their feet to ground them on the card.


I trimmed the image using one of Lawn Fawn's stitched rectangular dies.  I adhered the stamped paper onto craft paper only a 1/4" larger than the white paper.  From there, I used one of the scrap of the craft paper and some black scrap paper to stamp and emboss the sentiment.  After adding those to pieces under the cute couple, I finished it by gluing it down to a red card base.  How fun is this?

Now keep this technique in mind when you have small stamps that you're not sure how to use on an A2 size card.  Thanks so much for taking the time to read about this card and if you have any requests, please post below what you'd like to see more of.

Until next time...
Happy Valentine's Day
and
Happy Crafting!


Saturday, February 9, 2019

Eskimo Kisses

Hello crafty friends!  It's almost time for one of the most famous card holidays...Valentine's Day, and oh how I love that day!  Not for all of the romantic reasons, but purely for the fact that I help my kids make cards, I make cards and we fill them all out as a family.  Lisa here today, and I can't wait to share this sweet Valentine that I've created with the Sunny Studio Stamps set called Eskimo Kisses...


Aren't these little Eskimos the sweetest?  I love her expression the most.  Plus the sentiment is written in a script font that adds a touch of sophistication.  I colored these cuties in with various Spectrum Noir Markers, and propped them up with Sunny Studio Stamps patterned paper as well as one of their window dies.


So what about you?  Which holiday is your favorite to create cards for?  And don't forget to check out the amazing sale going on right now giving you 25% off any products listed under the Overstock category!

Happy Crafting/Shopping!
Lisa

Supplies Used:
https://craftydoodlechick.com/products/eskimo-kisses-stamps-sunny-studio 
https://craftydoodlechick.com/products/scrapbook-adhesives-1-4-3d-self-adhesive-foam-squares-308-pkg


Thursday, February 7, 2019

Hi Cutie!

Hi everyone!  It's Julissa of Paper Gems by Jules back again to share a fun card.  Valentine's Day is right around the corner and in case you have someone you love that isn't your Valentine, you can still send them some love.  


For this week's card, I used these adorable Lawn Fawn items.  I stamped the cute little skunk from the Stinkin' Cute Stamp set.  I colored it in using the Toner series of Copic markers.  I then moved onto the background.  Using Tim Holtz Distress Oxides in Picked Raspberry and Wilted Violet, I put a little of each on my glass mat and sprayed them with water.  I then used a piece of acetate to pick up each ink, one at a time, and applied it to a piece of Bristol smooth paper.


Once the oxide ink is dried, I stamped some of the little hearts using the same distress inks and the Gina K. Designs Amalgam ink.  Now taking the fun cell phone die from Lawn Fawn's Selfie Frames Lawn Cuts dies, I cut three layers in black card stock.  In between one of the layers, I added velum to define the space a little more.  Then, adding the little Stinkin' Cute skunk, I also added a little heart and sentiment to complete the card.


I'm sending this to one of my single friends just so she knows she is loved this Galentine's Day!  Are you sending Valentine's or Galentine's out this year?  If so, make sure to share them on

I hope you enjoyed this card and stay tuned for more amazing cards from the rest of the Crafty Doodle Design Team.


Happy Crafting, Everyone!


Friday, February 1, 2019

Happy Birthday with Rosie

Hello!  Happy February, and Happy Birthday to me! lol.  It's Lisa here today, and yes today is actually my Birthday.  So today I decided it would be the perfect day to make a Birthday card with some of my favorite products, and things that make me happy...


Rosie and Bernie are two of my favorite stamp characters.  One because I'm quite certain that Rosie is my inner child in stamp form, and two Bernie is a unicorn!  Need I say more?!  I colored them in with a mix of Spectrum Noir Markers and Sparkle Pens.  Next I added rainbow colored banners along the top and a diecut sentiment split in half so the front says Happy and the inside says Birthday.  Of course I couldn't have a card without a little bling on it, so I added a few flat back rhinestones and called it a day.


Thanks so much for stopping by today and seeing my take on one heck of a happy Happy Birthday card.
Happy Crafting!
Lisa

Supplies Used:
https://craftydoodlechick.com/products/rosie-and-bernie-in-hawaii-stamping-bella 
https://craftydoodlechick.com/collections/essentials-1/products/sticky-tape-runner-permanent-therm-o-web
https://craftydoodlechick.com/products/die-namics-big-birthday