Friday, November 30, 2018

CoffeeLovers Blog Hop 2018


Hello!  It's Lisa here with you today, and I'm so honored to take part in today's Coffee Lovers Blog Hop!  Woot woot!  And my card today uses the very cute Peace Love & Coffee Stamp Set by CAS-ual Friday Stamps...


This set might be small, but it sure is mighty.  It is jam packed with smaller images in a variety of sizes as well as a few sentiments.  For my card I started by stamping a few of these images randomly onto a pre-cut circle and heat embossed them in Bronze.  I then went over the circle with a variety of blue Distress Oxide  inks.  For a distressed look I also added a few splashes of water and let them work with the ink.  I then stamped and heat embossed my sentiment onto dark brown cardstock.  Finally, I stamped, colored and cut the sweet coffee cup image.  I used a mix of scraps I had in my drawer to layer my circles up, and finished my card off with a few rhinestones.


Thanks so much for stopping by the blog today, and while you're here we'd love to have you stop by the Crafty Doodle Chick Store to see the other awesome coffee and non-coffee related products available.

Products used:


Happy Hopping!
Lisa

Thursday, November 29, 2018

You Make Me Smile

Hey there, Crafty Doodle Chick Fans!  It's Julissa from Paper Gems by Jules on the blog today sharing an eclipse card.  Now, if you haven't done one before, they can take any one-layer scene and give it life!  Follow along to see how.

When I thought of this card, I knew I wanted a little texture so I used watercolor paper and blended Distress Inks to make the night sky and meadow.  Because it was watercolor paper, the colors did not cover the paper completely, leaving a the remanence of its original color, white.  To add the idea of stars, I first splashed some water and picked it up with a paper towel, lifting the color from the paper.  Then I flicked Distress Spray Stain in Picket Fence white.  The variating size and colors of the "stars" gave it a more realistic look.
The next step was to color the adorable character in this Dreamerland Crafts stamp "Field of Dreams."  This young man and his pups are jus so sweet.  For this image I opted to stamp it on Bristol smooth paper and use my copics to color him.  Once colored, I fussy cut him out.
The third step is where the eclipse happens.  I used a My Favorite Things "Smile" die-namics to die cut the word "SMILE" from the background image.  Before running it through my Big Shot, I used my t-ruler to line up the die on the paper and laid the little boy image to make sure the word "SMILE" would be clearly seen.
There are two ways to make an eclipse card.  You can use small pieces of foam tape to raise the letters.  However, I opted to die cut another three layers of the word "SMILE" and layer them under the originally cut letters.  This keeps the letters all balanced and looks a little neater.
Once all the letters are adhered, I put the rest of the card together.  Using My Favorite Things "From the Heart" sentiment stamp set to add the words "You Make Me" on a simple white strip of bristol smooth paper on the upper left corner.  By placing the little boy and his dogs on the lower right corner using Scrapbook Adhesive 3D Foam Squares, this gives the card balance.


Thank you for joining me this week!  I hope you enjoyed this technique and please give it a try and share on the Crafty Doodle Chick Chat & Create Facebook Page.

Until next time... Happy Crafting!


Wednesday, November 28, 2018

Christmas Woodland Critter Huggers Gift Cards

Hi! Kerys from Scrappinnhappy here today using this adorable Woodland Critter Hugger die set from Lawn Fawn. I had SO much fun with these dies and love how adorable all the critters turned out!


I used Lawn Fawn's Woodland Critter HuggersWoodland Critter Huggers Winter Add-on and the Stitched Gift Card Pocket for all of these gift cards.


I turned the critter huggers into a card by die cutting the main body from a folded piece of matching cardstock, ensuring the die sat just over the top of the card, so allowing the card to open. 

I attached the gift card pocket inside and stamped the sentiment from Lawn Fawn's Tiny Tag Sayings stamp set.


Thanks for looking and don't forget to check out the Crafty Doodle Chick blog for lots of inspiration from the rest of the design team

Happy Crafting x

Woodland Critter Huggers Dieswoodland critter huggers winter add-on - lawn cutsStitched Gift Card Pocket

Tuesday, November 27, 2018

One Chameleon in the Snow

Hi friends, Milene here! Welcome to the CDC blog! :)

I have been having so much fun creating nontraditional Christmas cards with Lawn Fawn
(Type my name in the search bar to see my previous nontraditional Christmas card!).


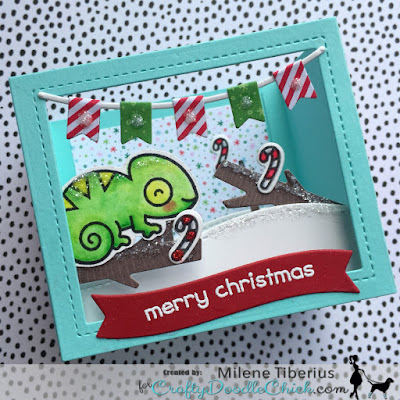
Today I am sharing a Shadow Box card featuring a chameleon in the snow, from the One In a Chameleon stamp set. In a way, I feel very much like this little chameleon! Being from Brazil, I have always experienced the holidays during summer time. The snow is still somewhat new to me - although I have lived in Indiana for a few years now. This little guy and I both love the idea of snow for the holidays!

If you have never created a Shadow Box card before, it is very simple. You will need to run the main die through your machine twice. Heavy weight cardstock works best, to assure a stable box. The die set includes two tabs that you may choose from. They make it quick and easy to add a ground to your scene. You may add as many of those as you would like. I added three white hills to this card.


I also used the branch dies included in the same die set. I die cut those using the Lawn Fawn Knock On Wood paper pack. I then decorated the inside of my box, as well as the two sides, using Doodlebug pattern papers. The die set includes rectangles that are perfectly sized to decorate your box.

The banner with flags come from the Lawn Fawn Scalloped Box Card Pop-Up die set. The sentiment banner, however, comes from the Lawn Fawn Mini Pop-Up Box die set. The words "Merry Christmas" were taken from another Lawn Fawn stamp set. I love being able to mix and match stamps and dies!


Coloring the chameleon image was very quick! I stamped him on Bristol Smooth cardstock using Versafine ink. I then picked out a few green Tombow markers, and blended the colors out using a Wink of Stella pen. I also stamped and colored a few candy canes from a different Lawn Fawn set, for a Christmasy touch.

I suggest adding the tabs and hills prior to assembling the box. I did not, and so it took me some time to get it all lined up. However, once everything was assembled, I was just about done!

I added some Nuvo Glitter Accents in Fresh Snowfall to my scene. Use whatever you have in your stash to add some sparkle!


That is all for me today. I hope you all have a great week!

See you next time,


Friday, November 23, 2018

Still Grateful...

Hello!  Happy Day after Thanksgiving to all of my fellow US crafters, hopefully you were able to get your fill of delicious foods and fun family time like we did.  I'm back today with a grateful card to share with all of you today...


I wanted to create the look of wood for the background of my card, and as I was looking through my stash I came across the Brush Waves Stencil by Studio Katia.  I noticed that when I held this stencil on it's side it resembled lines in the bark of a tree, so I grabbed my distress inks and white pigment ink and got busy.  Next I stamped my sentiment from the Newton's Nook Designs: Thankful Thoughts Stamp Set onto gold foil cardstock and embossed it in gold.  Finally, I stamped colored and cut out some smaller leaf images from the Sunny Studio Beautiful Autumn Set.

Thanks so much for popping by and don't miss out on the amazing SALE going on right now in the store!
Happy Crafting!
Lisa

Thursday, November 22, 2018

To My Soul Mutt

Happy Thanksgiving, everyone!  

This is Julissa, of Paper Gems by Jules.  I hope that you are all enjoying the holiday.  Today is about being thankful for all we have and giving to others.  Before we go into this delicate card using Whimsy Stamps, I'd like to ask all of you what you are most thankful for this holiday season.  This year, I am thankful for my health and the health of my family.  My brother was diagnosed a year ago with a cancerous tumor in his pancreas.  This year, after several surgeries and a few scares, he is cancer free and on the road to recovery.  We were lucky and we are all very thankful!  So, take a minute and comment below on what you are most thankful for this holiday season.

Now, back to all the crafty doodling...

This week, I wanted to play with one of my favorite Whimsy Stamps, "Soul Mutts." This stamp set comes with two main images, several great sentiments and a few great add on stamps for your background.  This set is very versatile.  I wanted to make this a winter scene to compliment the recent snow storm in our area.


Using watercolor paper for the textured look, I stamped the image and sentiment with Smokey Grey VersaFine ink and embossed with clear embossing powder.  I then used copic markers to color the image.  You could also used watercolors to color the images.  Once the images were done, I stamped the same image onto masking paper and fussy cute it out.  I laid the masked pieces on the images and colored the background using distress inks and a foam blending tool.


Once the background colors were complete, I used a grey shade of copic marker and added shadows to the floor to ground the image on the card.  Now, this could have been fine as is, but in order to really make it a winter scene, we needed snow.  First, I removed the masking, and as much as it hurt, I had to flick white paint over the image to give it the look of snowfall all around them.  Once dry, I added foam tape to the back of the watercolor paper, adhered it to the green card stock and layered on to patterned paper and lastly, onto the card base.  

The next time you're looking to make a winter scene, don't hesitate to pick out one of your favorite stamp sets purchased at CraftyDoodleChick.com and add flicks of white paint to make it snow!

Thank you for joining me this week and I am truly thankful to have so many creative people in our group!  Happy Crafting!

Soul Mutts


Wednesday, November 21, 2018

Love Ya A Latte

Hi! Kerys from Scrappinnhappy here on the blog today using a Fall/Winter themed stamp set to create a more loving/heartfelt card. I used Lawn Fawn's Thanks a Latte stamp set for this card.


I stamped the image onto Sunny Studio's Classic Gingham cardstock and then fussy cut it out. I die cut a Lawn Fawn heart from the grey gingham paper and added glossy accents on top. I die cut the cream topping for the latte from glitter cardstock using Lawn Fawn's Woodland Critter Huggers Winter Add-on dies.

I used textured paste with Newton's Nook's Tumbling Hearts stencil and washed over it in a ombre effect with watercolors once dry. I layered this over half of the card.

I die cut 2 circles and a couple of tags and stacked these onto the card with some bakers twine.

I die cut the word 'love' using a Lawn Fawn die and stacked these for dimension, adding some glossy accents too. The sentiment is from the Thanks a Latte stamp set and die cut with a banner die from MFT. All finished off with some heart shape sprinkles from Doodlebug.

Thanks for looking and don't forget to check out the Crafty Doodle Chick blog for lots of inspiration from the rest of the design team

Happy Crafting x

thanks a latte clear stamp set - Lawn FawnCLASSIC GINGHAM PAPER-Sunny Studiowoodland critter huggers winter add-on - lawn cutsTumbling Hearts Stencil Newton's Nook Designs

Tuesday, November 20, 2018

Howly-Jolly Christmas

Hi friends, Milene here!

Is everyone ready for Thanksgiving? I have skipped fall cards to jump right into Christmas cards this year! Today I am featuring the Christmas Puppies stamp set, from Gerda Steiner Designs


I have some tall, craft envelopes in my stash, so today I decided to go for that look! My card design today was inspired by Kristina Werner.


I started out by stamping the four dog images on regular white cardstock. I used a very light ink, as I wanted to do no-line coloring. I used Prismacolor pencils to color all of the images. I typically choose to go for a cleaner card design when I spend a lot of time coloring. This time around, I decided to create windows for the dogs to be picking out of.

I used a regular circle die, but Sunny Studio Stamps has an awesome Window Trio Circle die that makes things easier!


I dry embossed the same white cardstock using a 3D snowflake embossing folder - for the background of my images. I chose my favorite three images for the card front, and adhered them to my card using foam tape. The last image was added to the inside of my card, along with a scrap of the embossed paper I created. 

The sentiment was stamped on the bottom corner, using Distress Oxide Ink in Peeled Paint. My card was embellished using Stickles and Glossy Accents. I added Stickles in gold to the dog images, and clear to the hats and snowflakes on the background. Glossy Accents was added to their eyes and noses for a finishing touch.


Thank you so much for stopping by! Join our Chat & Create group to see more inspiration using this stamp set and more!


Wishing you all a happy Thanksgiving,


Friday, November 16, 2018

All About the Tag

Hello, hello!  Its Lisa back here on another glorious Friday with a super cute Lawn Fawn project to share with all of you...  I love all of the cute DIY packaging that is available now, but I also love a handmade tag, and when you put the two together it's a match made in heaven!


How cute is that?!  I'm obsessed with how easy and fun these Say What? Gift Tags are to create.  Of course the super cute Winter Penguin Stamp set looked great against the patterned paper from the Really Rainbow Christmas Petite Paper Pack.  For the sentiment I used the Say What? Christmas Critters Stamp Set.  Tied it onto my handmade paper bag, and viola!  A presentation that the recipient with love just as much, if not more, as the gift inside!


Happy Crafting!
Lisa

Supplies Used:


Thursday, November 15, 2018

Monster Fun Birthday Card!

Happy Thursday, everyone!  It's Julissa, from Paper Gems by Jules, back to share another fun interactive card using My Favorite Things "Monster Sized" stamp set!  It's so fun, you'll SCREAM!


The materials used to make this card were:


First, I cut a Bristol smooth white sheet to 5" x 3.75".  I stamped the middle monster first onto my card layer.  I then created a mask of that image.  Second, I stamped the two additional monsters on the left and the right of the first image.  I also created masks for those characters as well.  Once all the masks were put on the three images, I colored in the back ground.  To add a little more dimension, I used Altenew's "Warp Speed" stencil with a darker distress ink.  From there, I removed the masks and colored in the images.  


On another piece of bristol smooth paper, I stamped the fourth monster, colored it and fussy cut it out.  Then I went back the the card layer and used Lawn Fawns slider die, to create a channel for the monster to glide through.  Using a round foam adhesive, I centered the forth monster through the channel and added the foam dot.  I then placed a round acetate shape to the other side of the adhesive.  This allows the image to glide back and forth through the channel without falling out.  

(Music Credit: "The Walker" by Fitz and the Tantrums)

In order to adhere this layer onto the card base while allowing the sliding mechanism to work, I used Scrapbook Adhesive 3D 1/2" Foam Squares to pop up the layer onto the card.  From there I was able to tilt the image back and forth having the monster celebrate the recipient' birthday with cartwheels!  Check out the video above to see him go!


This monstrous card is sure to make someone's birthday super special!

Thank you so much for following along.  I hope you enjoyed my card and if you have any questions, feel free to comment below.  Until next time, Happy Crafting!